 +1.917.695.7440

Dynamics 365 for Customer Service provides a very powerful platform for building a Helpdesk system. This blog explains the various elements of support process right from first stage: Case creation from email to final stage: Case resolution.
Please note that even though this blog occasionally references Zap Helpdesk App…you can apply the same concepts when designing your own helpdesk-support process.
1. Requestor sends email to your support mailbox (support@mycompany.com):
Let’s consider an example scenario: Customer/Requestor is getting an error when importing leads and so raises a case by sending email to your support mailbox (eg support@zapobjects.com)
Screenshot below shows the email sent by Requestor (Ken Chako – From Insure-Me) to Zap Objects Support mailbox

2. Helpdesk Email-to-Case module creates new case and can additionally perform the below functions:
- Setting Case Customer and Case Contact (based on sender email address of the received email)
- Email body stripped of HTML tags and copied over to Case description field
- Setting of any default values of the Case (eg set Case Origin or Priority or Owner based on certain configured conditions)
- Spam protection (Stop creation of Case if email received from certain email addresses or domains or having certain keywords in email subject)
- Prevent Cases to be created from older emails (if you delete emails from Dynamics 365… then dynamics populates them back from mailbox… this can result in duplicate cases getting created)
- Parsing the email body if needed to set Case fields (eg automated email received from website form)
- Optionally remove received email from Queue
- Ability to route newly created case to a different queue
- Plus many more
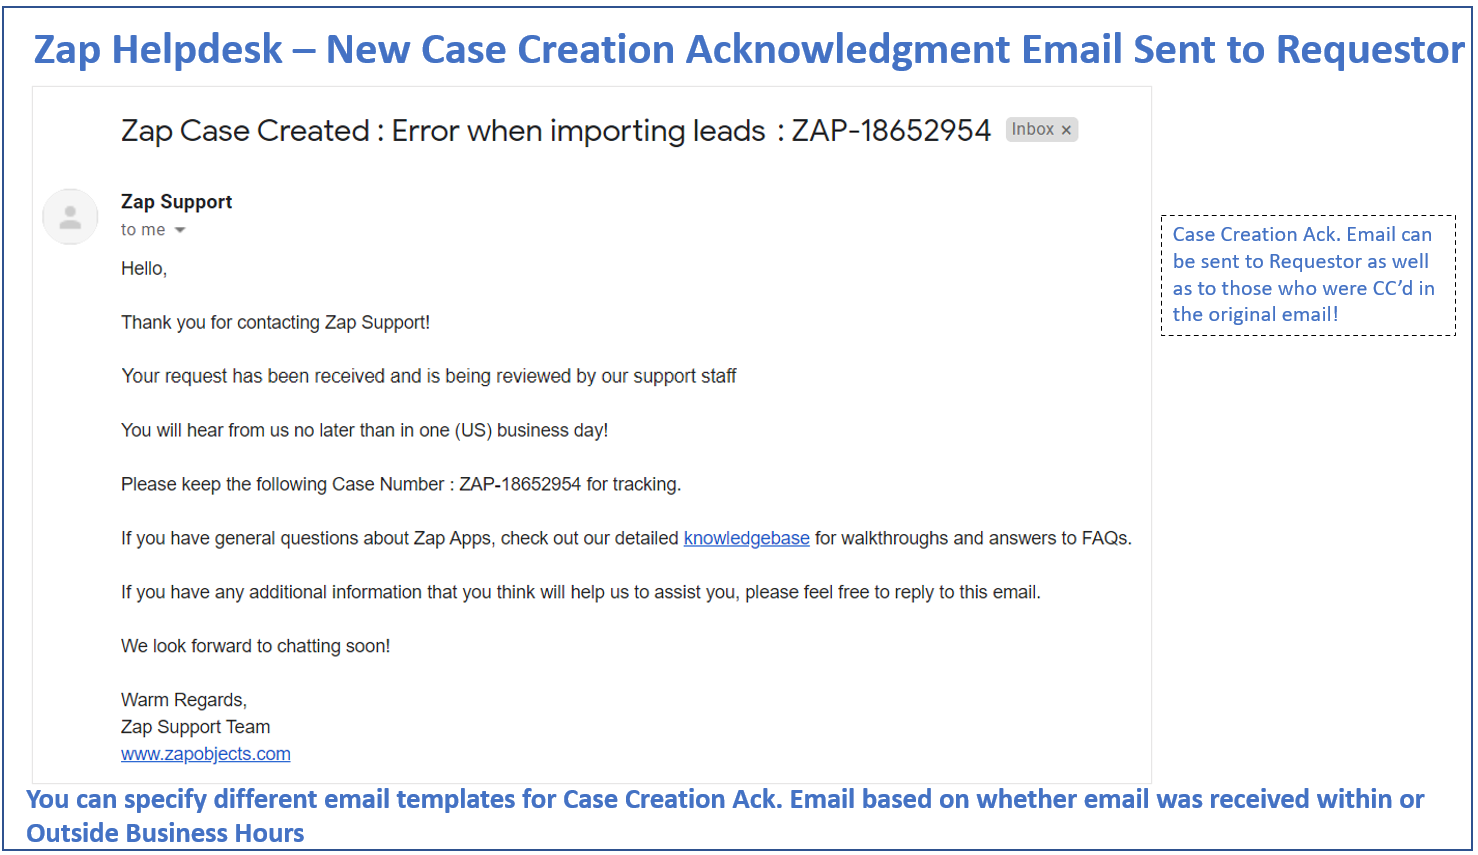
3. Case creation acknowledgment email notification is automatically sent to Requestor / Customer:
Screenshot below shows the email notification that was sent to Requestor / Customer on case creation within regular business hours: (you can optionally configure a different email template for case created outside business hours)
4. Case creation email / In-App notification is automatically sent to internal support team / case owner informing them of this new case that was created:
Screenshot below shows the email notification that was sent to internal support team / case owner:

Screenshot below shows the In-App notification that was sent to internal support team / case owner:

Zap Helpdesk App comes with standard set of Notification rules that can be easily switched On/Off.
These notifications can be sent by email as well as In-App.
Below screenshot shows some of the Notifications which come built-in Helpdesk App:

5. Support agent directly opens the Case in Dynamics 365 by clicking the case URL which was sent in email notification or from Case URL received in In-App Notification.
Screenshot below shows the Case form with fields auto-populated:
Case Title: Email Subject,
Case Description: Email Body with HTML tags stripped out
Case Customer: Account of Contact with matching email, (Can be set to exclusively Account too if needed)
Case Contact: Contact with matching email, (We also set a custom field “Sender Contact” with the matching Contact record… This can be used in your notification workflows… as Case Contact look-up field has certain limitations…eg it can be set only when Case.Customer is its “Parent Account”)
Case Source: Email (Can be set using “Rules Configurator”)


6. Support agent wants to reply back to Requestor / Customer:
Support Agent can respond back to Requestor / Customer from Outlook or Dynamics 365.
Responding from Outlook:
When responding from Outlook, agent needs to mark support email address in CC. This way the email response will get automatically tracked to the Case record. In addition, Zap Helpdesk can automatically detect this email from support agent and change the case status to indicate that this Case has been responded back! (there is a configuration setting called as “Reset Case Status when new support team response for support case detected”)
Responding from Dynamics 365:
We provide 2 approaches for responding from Dynamics 365 Case Form:
Approach 1: Using our custom built “Email Reply” tab:
This is our old classic approach – Responding from our custom built “Email Reply” tab added to Case form.
“Email Reply” section consist of: Email editor and Drag-and-Drop attachments control which have been embedded directly in the case form as shown in screenshots below:
Screenshot: Email editor:
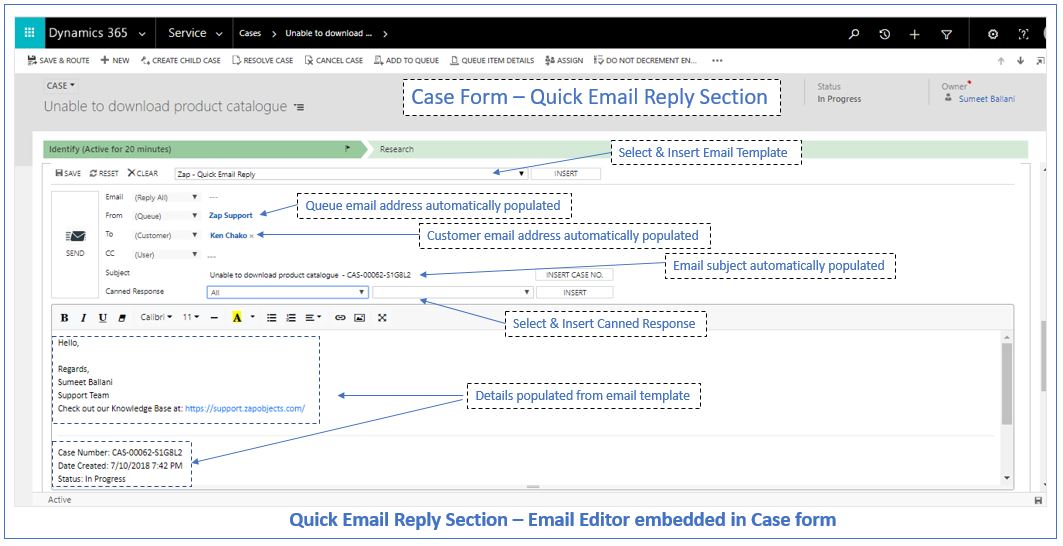
All fields in the quick email reply section (From, To, email subject, email body) have been auto-populated… there by speeding up the time needed to compose an email!!!
For more details, regarding using this feature, refer blog: Using “Email Reply” tab (link). Responding from Mobile App (link)
Approach 2: Using “Quick Response” feature (Released: July 2024)
– Select correct & possibly multiple Email Recipients
– Add case email history summary in email body (This is not must but a good to have feature. Most third party Customer Support systems like Zendesk / Freshdesk have a functionality to extract the newer email responses from all incoming/outgoing emails and create a clean email communication summary… which they automatically attach to each agent response)
- Auto-populate Email FROM Recipient (Can be Queue or user – based on helpdesk settings)
- Auto-populate Email TO Recipient (will Customer + any additional recipients marked in the incoming email which created the case)
- Auto-populate Email SUBJECT with Case Number & Case Title (as per the selected email template)
- Auto-populate Email BODY with Signature + Full CLEAN History of email & portal communication (for more details regarding this, refer point 9)
- Allow adding of CANNED Responses

For more details regarding this feature, refer blog (link)
7. When composing the email, Support agent can select multiple Canned Responses:
Canned responses help facilitate faster replies to customer and boost agent productivity. These are scaled down version of email templates. You would use canned responses to insert pre-typed text / sentences multiple times across your email.
Next, agent can select the canned response and click button “Copy To Clipboard & Close”.

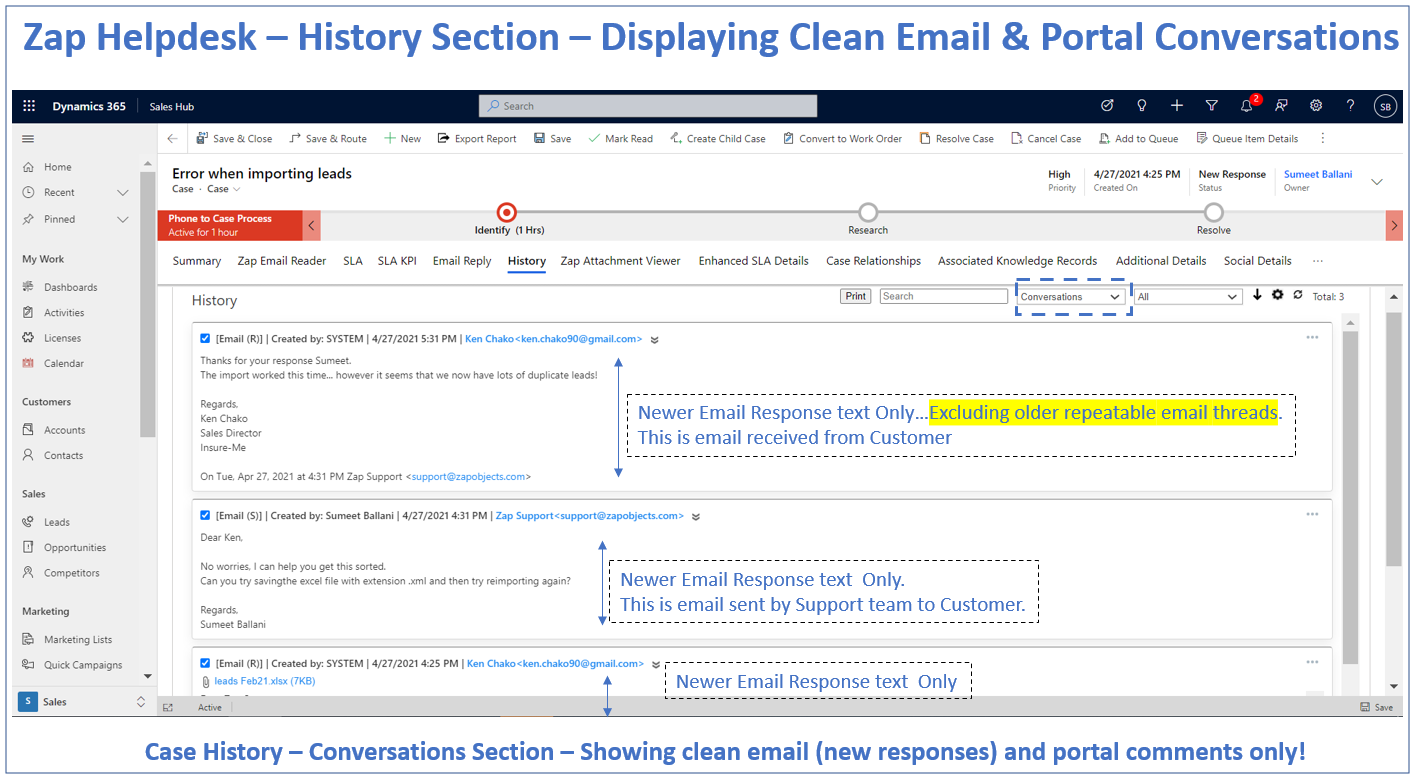
8. To get better understanding of Case Email communication, Support Agents can now refer Zap Case History (added to Case form):
We have observed the following in regards to communication between Support Agent & Customer (Requestor of Support Case):
- Customer mainly interacts with Support team through emails.
- Multiple people from Customer’s team can also respond through email.
- Now each email has actual response + redundant responses from previous conversation thread.
- This “mix bag of responses” can make it very hard to see “who said what and when”
- Reading emails in Timeline is not easy!
Zap Helpdesk App now adds a “History Section” in Case form. It consists of 2 areas: Conversations & History.
Conversation Area: This consists of Clean Email & Portal Comments. Here only the newer responses from email are shown… remaining part of email is excluded… this gives a clean, noise-free and easy to read email communication!
Screenshot below shows the History section – Conversations Area:
History Area: These display: Case field changes, Automated Email Notifications, Emails Sent/Received
Screenshot below shows the History section – History Area in Case form:
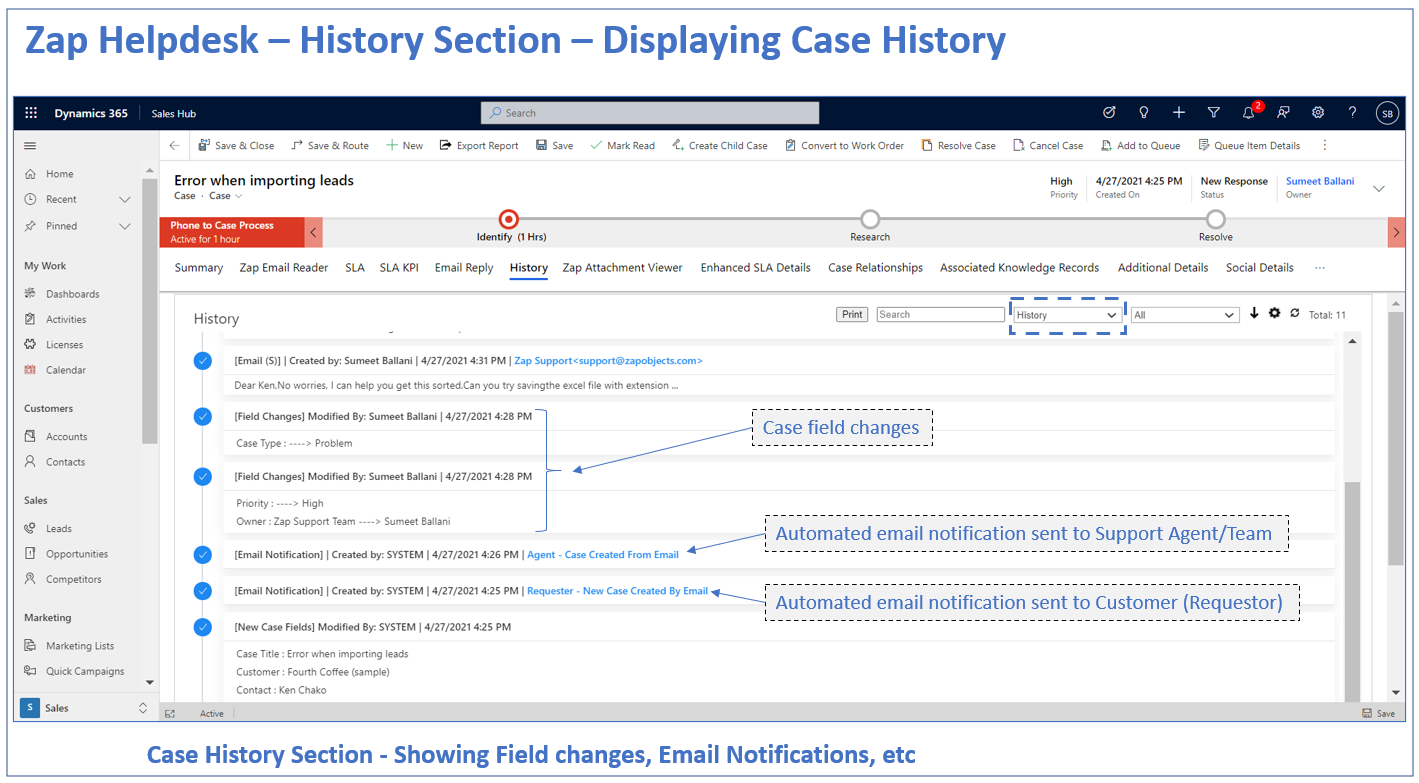
Thus you can see that the Case-History section can provide a good visibility of Case progress and complements the present Case Timeline view.
9. All done! Support agent sends the email by clicking the “Send” button (in Email Reply Section):
10. Now Customer/Requestor replies back to the support agent’s email.
Zap Helpdesk App can automatically detect a Customer response and notify the Case Owner or Support team regarding this. (this can be done using an email notification and/or In-App Notification)
This point has been highlighted because out-of-box there is no easy way to know when a new email response has been received from the Customer (regarding an existing Case)
Besides Case Status can also be reset to “New Response” (or any custom status that you use). This way you can easily filter on Cases which have received a new response (either from email or portal comment).
11. Back-and-forth email communication between Customer and support team happens. Case may or may not be transferred to multiple support agents. As long as the case number is present in the email subject, all email communication would be automatically tracked against the case.
12. Case Resolved: When case is resolved, support agent can close the Case. An automatic email notification can be sent to the Customer acknowledging the closure of the case.
How Case Status can help in tracking Case progress and defining business rules:
Another important consideration when designing Support process is defining various Case Statues that can help track your support process progress.

For more details, refer blog: Case Lifecycle Management using different Case Statuses when using Zap Helpdesk App for Dynamics 365 for Customer Service (link)
Additional Helpdesk functionality:
- Recent Case Updates Panel: Does your Support Team have good visibility of Case Updates?? You would say that you are tracking new updates to Cases based on Case Status changes. However there are lots of other updates happening in Cases on day-to-day basis which cannot be seen from Case View. Now using Zap “Recent Case Updates” panel, you can see all Case Updates like:
- Notes Added
- Email Sent by Support Team (+ if opened by Customer – zap helpdesk is compatible with dynamics 365 email engagement feature)
- Email Received
- Field Changes (eg Case Status changed from New to In-Progress OR Case Priority changed from Low to High…. Please note that you can configure which fields in Case to be tracked)
- Automated Email Notifications which were sent to Customer
- Portal Comments Added

- Fwd to Create New Case: We have observed that customers occasionally send emails directly to the support in-charge (eg agent@zapobjects.com), instead of generic company support mailbox (eg support@zapobjects.com)
“Forward to Create New Case” allows creation of new case by forwarding the customer email to support mailbox. Zap Helpdesk then intelligently retrieves the customer email address from the forwarded email body and links the case to the original customer! Further, new case creation notification is also sent to the customer!

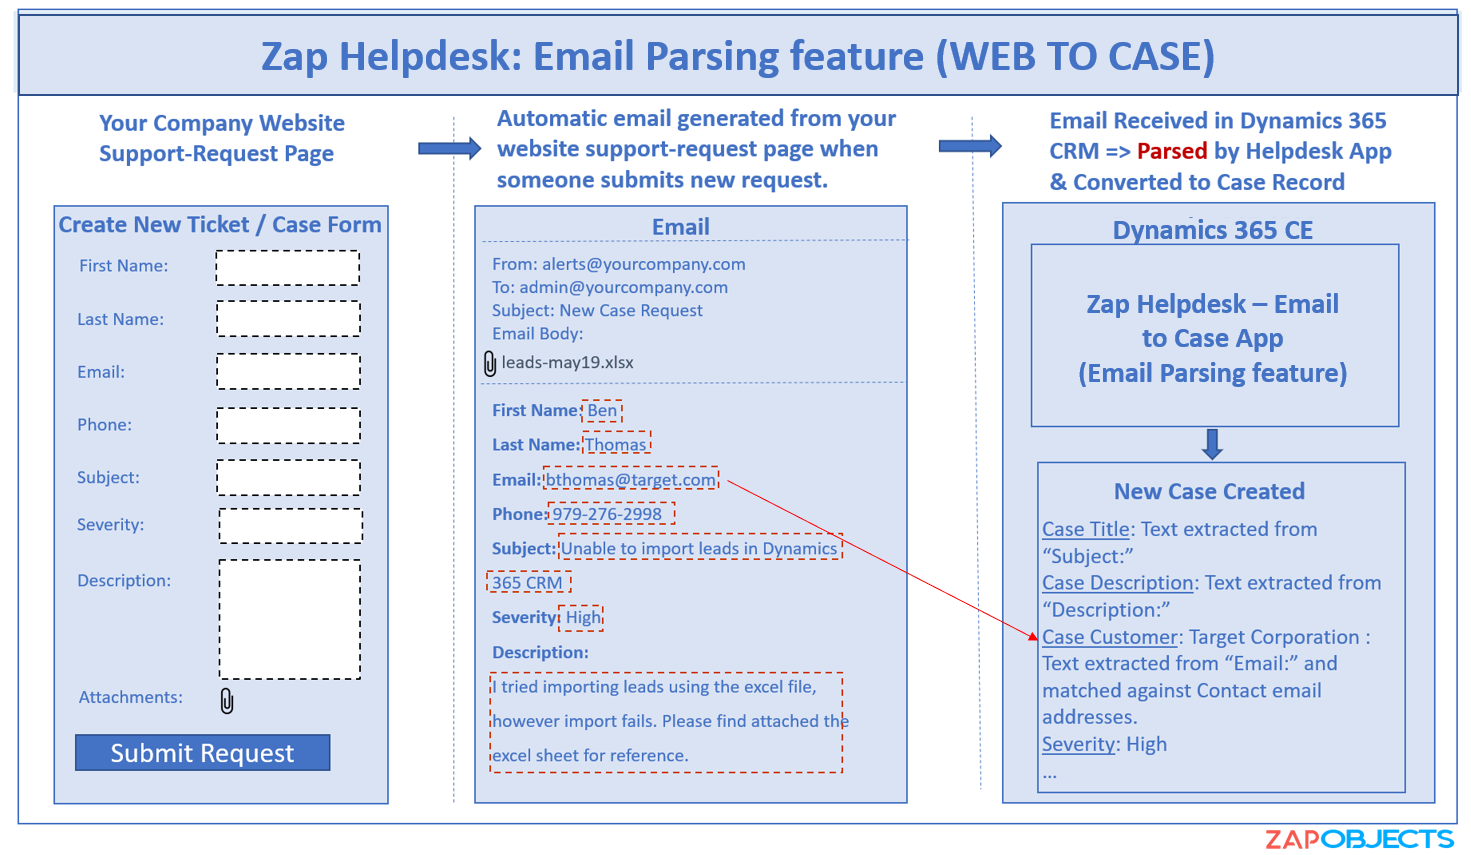
- Web To Case (using Email Parsing): Along with providing Support email channel (support@yourcompany.com), you may also have a “Support Request” page on your website. When user fills in the page, you may be receiving an auto-generated email with the customer issue details.
Now using Helpdesk “Web-to-Case” feature, you can directly have this email parsed and create Case record in CRM…with all important case fields automatically populated with the issue details.

- Email Commands: Perform activities on your cases directly from Outlook!
Few common examples of using email commands are: performing activities such as changing the case status, assigning it to a different agent, adding a note, responding to Requestor with full chain of conversation history from your Outlook but having email automatically go from your Support Queue (which is also the most requested Use-Case), getting case history etc.
Miscellaneous Use-Cases where other Zap Apps can help with Helpdesk process:
- Zap PSA Time Entry App allows Support Agents to easily add billable/non-billable time. You can add time entry automatically using Timer or manually by entering Start/End Times or Duration!

- Zap Email Reader App provides Outlook like interface to read emails within Dynamics. Reading emails in timeline view (in Case form) is not very user-friendly and you can often get lost in multiple email threads. For faster & easier reading of all Customer emails in Case form, you can use Zap Email Reader!

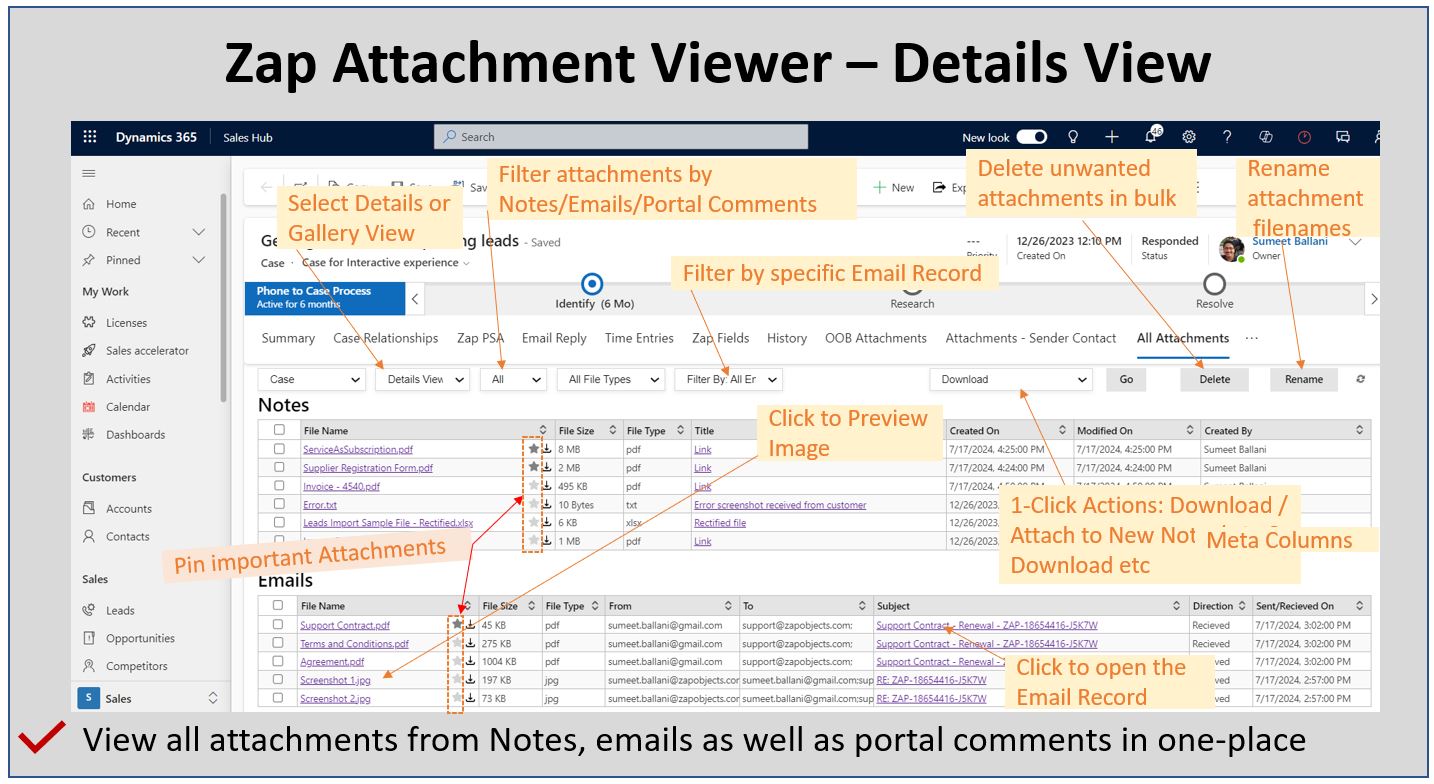
- Zap Attachment Viewer App allows Support Agents to easily go through all attachments received from Customer(in emails or saved in Case Notes).
Screenshot below shows the “Attachment Viewer” section in Case form:
- Zap Notifications Generator App can alert/notify users whenever Case is assigned / Case is over-due.

- Zap Report/View Scheduler App can allow scheduling daily/weekly reports to Support Team to keep them updated with Cases which are still in open status and needs to be actioned!
Further, you can also have a Case Resolution / Summary Report (PDF) be sent in email to customer automatically when case is closed (using Document generation feature of Report Scheduler App)!

Try-out Zap All-in-One Combo plan which provides license to all Zap Apps!